Also its called a „Car polishing”.
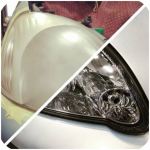
Buffing a car is a process that removes a small layer of lacquer from a car’s body finish, leaving with a fresher and shiny layer afterwards. This process restores the car’s original luster and will improve the car’s overall appearance. This process also brings up the vehicle’s beauty and its value.
Buffing your car can drastically improve its appearance by removing swirl marks, light scratches, oxidation, and other imperfections, revealing a deep, glossy shine. It’s a process of gently abrading the clear coat (the top layer of your car’s paint) to level out these defects.
Here’s a comprehensive, step-by-step guide on how to buff a car, including the tools and compounds you’ll need:
Understanding Buffing vs. Polishing vs. Waxing
Before diving in, it’s helpful to understand the distinctions:
- Compounding/Buffing: This is the most abrasive step, using compounds with larger abrasive particles to remove deeper scratches, oxidation, and swirl marks. It effectively „cuts” into the clear coat to level out imperfections.
- Polishing: Less aggressive than compounding, polishing uses finer abrasives to refine the surface after compounding or to address lighter imperfections like minor swirl marks and hazing. It enhances gloss and clarity.
- Waxing/Sealing: This is a protective step that adds a sacrificial layer over the paint to protect it from environmental contaminants and enhance shine. It does not correct paint imperfections.
For a full paint correction, you often progress from compounding to polishing, then to waxing/sealing.
Tools and Compounds You’ll Need:
Preparation:
- Car wash soap and buckets: For thorough cleaning.
- Wash mitts and drying towels (microfiber): To prevent scratching during washing and drying.
- Clay bar and clay lubricant: To remove embedded contaminants from the paint.
- Painter’s tape: To mask off trim, rubber, and unpainted plastic to prevent damage or staining.
- Detailing light or bright flashlight: To inspect the paintwork for imperfections.
- Gloves: To protect your hands from chemicals.
Buffing/Polishing:
- Buffing machine:
- Dual-Action (DA) polisher (recommended for beginners): These machines orbit and rotate, making them safer and more forgiving to use, with a lower risk of burning through the paint.
- Rotary polisher (for experienced users): More aggressive and faster, but requires significant skill to avoid paint damage.
- Backing plate: To attach the pads to the polisher, sized appropriately for your pads.
- Buffing pads: These come in different materials and abrasiveness levels, often color-coded. You’ll need:
- Cutting pads (more aggressive, e.g., wool or firm foam): For use with cutting compounds to remove heavy defects.
- Polishing pads (medium abrasive, e.g., medium foam or microfiber): For use with polishing compounds to refine the surface and remove lighter swirls.
- Finishing pads (least abrasive, e.g., soft foam): For use with finishing polishes or glazes, or for applying waxes/sealants.
- Cutting compound: An abrasive liquid designed to remove scratches, oxidation, and heavy swirl marks.
- Polishing compound/polish: A less abrasive liquid used to remove lighter imperfections and enhance gloss.
- Microfiber towels: Several clean, soft microfiber towels for wiping off excess product and buffing to a shine.
- Pad cleaner brush or compressed air: For cleaning pads during and after use.
- Isopropyl alcohol (IPA) solution or panel wipe: To remove polishing oils and inspect the true condition of the paint.
Protection (Optional but Recommended):
- Car wax or paint sealant: To protect the freshly buffed paint.
- Applicator pads: For applying wax or sealant.
Step-by-Step Guide:
Phase 1: Preparation is Key!
- Park in a Shady Area: Direct sunlight can cause products to dry too quickly and make it difficult to see imperfections. Ensure the car’s surface is cool to the touch.
- Thoroughly Wash Your Car: This is crucial! Any dirt or grit left on the paint can cause more scratches when you buff.
- Use the two-bucket method (one for soapy water, one for rinsing your wash mitt).
- Clean wheels first, using a separate mitt and bucket.
- Wash the car from top to bottom, rinsing frequently.
- Dry the car completely with soft microfiber drying towels.
- Decontaminate the Paint (Clay Bar): Even after washing, there are often embedded contaminants (like industrial fallout, rail dust, tar) that washing alone won’t remove. These feel like tiny bumps on the paint.
- Spray a section of the paint (e.g., 2×2 ft) with clay lubricant.
- Flatten a piece of clay bar and gently glide it back and forth over the lubricated area. You’ll feel it grab at first, then glide smoothly as contaminants are removed.
- Fold and knead the clay frequently to expose a clean surface.
- Wipe away any residue with a microfiber towel.
- Repeat until the entire car feels smooth.
- Re-Wash and Dry (if necessary): If you picked up a lot of contaminants during claying, a quick rinse and dry is a good idea to ensure a clean surface.
- Mask Off Trim and Sensitive Areas: Use painter’s tape to cover any rubber trim, plastic pieces, badges, or areas where the paint is very thin to prevent damage or product staining.
Phase 2: Buffing and Polishing
- Inspect the Paintwork: Use your detailing light or flashlight to identify the type and severity of imperfections (swirls, scratches, oxidation). This will help you choose the right compound and pad.
- Start with the least aggressive method first. You can always go more aggressive if needed, but you can’t put paint back on.
- Choose Your Pad and Compound:
- For heavier defects: Start with a cutting compound and a cutting pad.
- For lighter defects or after cutting: Switch to a polishing compound and a polishing pad.
- For finishing and maximum gloss: Use a finishing polish (even less abrasive than a polishing compound) and a finishing pad.
- Prepare Your Polisher:
- Attach the appropriate backing plate and buffing pad to your DA polisher.
- If using a new pad, spray a little detailer on it to prime it and ensure better application.
- Apply Compound to the Pad: Apply a few pea-sized drops of compound directly to the buffing pad. Avoid applying it directly to the car, as it can splatter.
- Work in Small Sections: Divide your car into small sections (e.g., 2×2 ft or one body panel at a time). This ensures even coverage and prevents the compound from drying on the paint.
- Spread the Compound: Before turning on the polisher, dab the pad onto the section you’re working on to spread the compound evenly.
- Begin Buffing:
- Turn on your DA polisher to a low speed (e.g., speed 1-2) to further spread the compound without splattering.
- Increase the speed to a medium setting (e.g., speed 4-5 for a DA polisher).
- Use light to moderate, even pressure. Let the machine do the work. Avoid pressing too hard, as this can generate excessive heat and damage the paint.
- Move the polisher in a consistent, overlapping pattern. Many detailers use a „cross-hatch” pattern (moving horizontally, then vertically over the same area). Overlap each pass by about 50%.
- Keep the pad flat on the surface at all times. Tilting the pad can create uneven results or burn through the paint.
- Work the compound until it becomes transparent or breaks down (check the product instructions). This usually takes 3-4 passes over the section.
- Important: Keep the polisher moving! Never let it sit in one spot while running.
- Wipe Off Residue: Once you’ve completed a section, immediately wipe off any excess compound residue with a clean microfiber towel. Fold the towel frequently to expose a clean side.
- Inspect Your Work: Use your detailing light to inspect the section you just worked on. Check for remaining swirl marks, scratches, or hazing.
- If defects remain, you can repeat the process on that section, or if necessary, switch to a more aggressive pad/compound combination (only if the initial choice wasn’t sufficient).
- After buffing with a cutting compound, you’ll almost always need to follow up with a polishing compound and a polishing pad to refine the finish and maximize gloss.
- Clean Your Pads: After completing a section or two, clean your buffing pad using a pad cleaner brush or compressed air. This prevents product buildup and ensures optimal performance.
- Repeat: Continue this process, section by section, until you have buffed and polished the entire car.
Phase 3: Protection (Highly Recommended)
- Panel Wipe/IPA Wipe Down: After all buffing and polishing steps are complete, wipe down the entire car with an IPA solution (e.g., 1:1 ratio of isopropyl alcohol and distilled water) or a dedicated panel wipe. This removes any leftover polishing oils that might mask imperfections or prevent your wax/sealant from bonding properly.
- Apply Wax or Sealant: This final step protects your freshly corrected paint and adds an extra layer of shine.
- Apply a thin, even coat of your chosen wax or sealant using an applicator pad.
- Follow the product instructions for cure time.
- Buff off the residue with a clean, soft microfiber towel to a brilliant shine.
Common Mistakes to Avoid:
- Working in direct sunlight or on a hot surface: Leads to premature drying of compounds and potential paint damage.
- Not thoroughly cleaning the car beforehand: Introduces new scratches.
- Using too much product: Makes it harder to work and wipe off.
- Applying too much pressure: Can burn through the clear coat or create holograms.
- Not keeping the polisher moving: Causes excessive heat buildup and paint damage.
- Using dirty pads or towels: Reintroduces scratches. Clean your pads frequently.
- Skipping the inspection step: You won’t know if you’ve achieved your desired results.
- Not protecting the paint afterward: All your hard work will be exposed to the elements and fade faster.
Buffing a car takes time and patience, but with the right tools, compounds, and techniques, you can achieve impressive, professional-looking results right in your own garage!